
Linux RISC-V APLIC分析

0 参考

The RISC-V APLIC’s New Features – Stephen Marz

本博客系列涉及此处编写的代码:https://github.com/sgmarz/riscv_msi。

APLIC规范(仍处于草案阶段)是高级中断架构(AIA)规范的一部分,保存在此处:https://github.com/riscv/riscv-aia。

1 介绍

高级平台级中断控制器(APLIC)是SiFive公司的PLIC的高级版本。其主要提升在于**支持通过消息发送中断。**因此,当与IMSIC配对时,APLIC可以像任何其他硬件设备一样发送消息。

原始PLIC的主要目的是聚合、优先处理和发送硬件中断信号。它为操作系统提供了一种声明、处理和完成中断请求的方法。APILC通过 “外部中断” 引脚向特定的HART(硬件线程,即CPU核心)发送通知。然后,该HART通过从特定的PLIC寄存器(称为 claim 寄存器)读取来确定中断的来源。这将返回一个标识设备的数字。通常,这个数字指向连接硬件设备和PLIC的特定线路。

2 APLIC

新的APLIC与SiFive PLIC不兼容。其中一些概念和特性是相同的,但寄存器文件和映射是不同的。从技术上讲,可以实现一个没有完整APLIC的系统,但AIA文档明确指出:“ 完全符合高级中断架构需要APLIC ”。

首先,APLIC寄存器布局如下:

1
2
3
4
5
6
7
8
9
10
11
12
13
14
15
16
17
18
19
20
21
22
23
24
25
26
27
28
29
30
31
32
33
34
35
36
37
38
39
40
41
42
struct Aplic {
pub domaincfg: u32, // Domain CSR that controls how this APLIC functions
pub sourcecfg: [u32; 1023], // Source configuration for 1023 interrupts
_reserved1: [u8; 0xBC0],

pub mmsiaddrcfg: u32, // Machine-level MSI address (for APLIC to write MSIs)
pub mmsiaddrcfgh: u32,
pub smsiaddrcfg: u32, // Supervisor-level MSI address
pub smsiaddrcfgh: u32,
_reserved2: [u8; 0x30],

pub setip: [u32; 32], // Bitset to set pending interrupts (32 IRQS per element)
_reserved3: [u8; 92],

pub setipnum: u32, // Sets a pending interrupt by number
_reserved4: [u8; 0x20],

pub clrip: [u32; 32], // Bitset to clear pending interrupts (opposite of setip)
_reserved5: [u8; 92],

pub clripnum: u32, // Clears a pending interrupt by number
_reserved6: [u8; 32],

pub setie: [u32; 32], // Bitset to enable interrupts
_reserved7: [u8; 92],

pub setienum: u32, // Enable an interrupt by number
_reserved8: [u8; 32],

pub clrie: [u32; 32], // Bitset to disable interrupts (opposite of setie)
_reserved9: [u8; 92],

pub clrienum: u32, // Disable an interrupt by number
_reserved10: [u8; 32],

pub setipnum_le: u32, // Set an interrupt pending by number always little end first
pub setipnum_be: u32, // Set an interrupt pending by number always big end first
_reserved11: [u8; 4088],

pub genmsi: u32, // Used to generate MSIs
pub target: [u32; 1023], // Target control per interrupt
}

下面介绍一些重点寄存器:domaincfg/sourcecfg/setip/clrip/genmsi/target

2.1 Domain Configuration Register (domaincfg)

img

域配置寄存器(32位)该寄存器有三个可用字段:

  • 中断使能(IE,第8位)
  • 传递模式(DM,第2位)
  • 大小端模式(BE,第0位)

首先的 8 位是一个字节顺序标记,目的在于测试寄存器是大端序还是小端序。它被设置为 0x80,以便我们可以测试寄存器的字节顺序。例如,如果我们执行一个 “加载字”( lw 指令在RISC-V中),并且在第一个字节中得到 0x80,那意味着机器是大端序。如果没有得到 0x80,则是小端序,并且加载的字节包含传输模式和大端序位。

中断使能位(Interrupt enable bit)用于使 APLIC 能够发送中断信号(1 = 使能,0 = 禁用)。这并不意味着中断一定会被接收到,而仅仅表示 APLIC 可以通过触发一个挂起位来发送中断信号。

中断投递模式(DM)位允许配置 APLIC 以发送常规中断,类似于旧的PLIC,或者以消息形式发送中断(MSI)。如果 DM 位设置为 0,则会发送直接中断,类似于旧的 APLIC。如果 DM 位设置为 1,则会发送 MSIs。

大端位允许 APLIC 以大端模式(BE = 1)或以小端模式(BE = 0)写入消息。但是,BE位还会影响多字节域配置寄存器的顺序。最高有效字节被故意设置为 0x80,作为一种字节顺序标记。

我们可以写一个Rust函数来设置域注册。该注册函数中的所有参数都是布尔类型。

1
2
3
4
5
6
7
8
9
10
impl Aplic {
pub fn set_domaincfg(&mut self, bigendian: bool, msimode: bool, enabled: bool) {
// Rust library assures that converting a bool into u32 will use
// 1 for true and 0 for false
let enabled = u32::from(enabled);
let msimode = u32::from(msimode);
let bigendian = u32::from(bigendian);
self.domaincfg = (enabled << 8) | (msimode << 2) | bigendian;
}
}

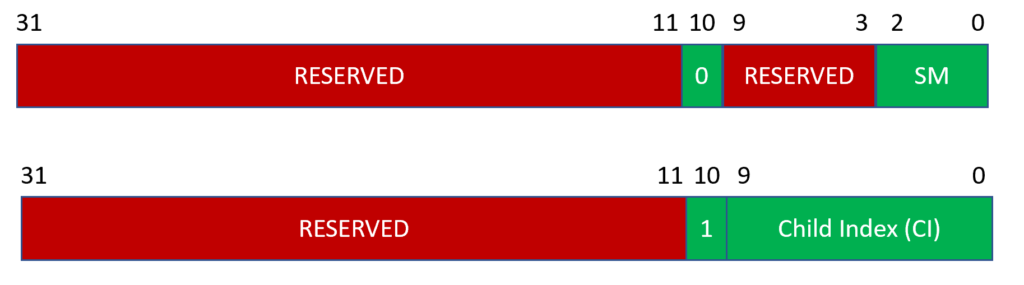
2.2 Source Configuration Registers (sourcecfg[u32; 1023])
img

If bit 10 (delegate) is 0, SM is in bits 2:0. If D=1, bits 9:0 mark the child index.

如果位10(代理)为0,则SM位于位 2:0。如果D=1,则位 9:0 标记子索引。

每个可能的中断都有一个 sourcecfg 寄存器。请记住,中断0是不可能的,所以中断 1 的源配置寄存器在 sourcecfg[0] 中。这就是为什么我提供的 Rust 代码示例会从中断源的值中减去 1 的原因。

委托位 D(位10)可以读取以确定所给中断是否已被委托。该位是可读写的。如果我们将1写入该字段,则将其委托给子域。如果该特定源没有子域,该位将始终被读取为0。

源模式位 SM(位2:0)控制着对于那些未委派的中断如何触发。如果一个中断被委派(D=1),位9:0描述了它被委派给的子中断的索引。如果中断未被委派(D=0),那么每个中断源可以通过以下方式之一配置为触发 “挂起” 中断。

3-bit “SM” value Register Name Description
0 Inactive The interrupt source cannot generate an interrupt and is inactive.
1 Detached The interrupt can only be generated by writing directly to the APLIC.
2, 3 Reserved
4 Edge1 The interrupt is asserted on a rising edge (from 0 to 1).
5 Edge0 The interrupt is asserted on a falling edge (from 1 to 0).
6 Level1 The interrupt is asserted when high (device IRQ pin is asserted).
7 Level0 The interrupt is asserted when low (device IRQ pin is deasserted).

一个不活动的中断源无法通过APLIC产生中断,我们也无法通过写入中断挂起寄存器来手动触发中断。一个分离的中断源无法被设备触发,但是我们可以手动写入MMIO APLIC寄存器来触发中断。

1
2
3
4
5
6
7
8
9
10
11
12
13
14
15
16
17
18
19
20
#[repr(u32)]
enum SourceModes {
Inactive = 0,
Detached = 1,
RisingEdge = 4,
FallingEdge = 5,
LevelHigh = 6,
LevelLow = 7,
}
impl Aplic {
pub fn set_sourcecfg(&mut self, irq: u32, mode: SourceModes) {
assert!(irq > 0 && irq < 1024);
self.sourcecfg[irq as usize - 1] = mode as u32;
}

pub fn sourcecfg_delegate(&mut self, irq: u32, child: u32) {
assert!(irq > 0 && irq < 1024);
self.sourcecfg[irq as usize - 1] = 1 << 10 | (child & 0x3ff);
}
}

2.3 Set/Clear Pending/Enable Interrupt (setip/clrip) Registers

这些寄存器控制着中断是否处于挂起状态。当启用的中断被触发时,APLIC将自动设置这些位;然而,我们也可以手动将中断设置为挂起中断。

这些寄存器与IMSIC寄存器不同。有一组寄存器用于设置待处理中断,另一组寄存器用于清除待处理中断。

setipnumclripnum 寄存器的功能与以下使用 setip/clrip 寄存器的 Rust 函数类似。

1
2
3
4
5
6
7
8
9
10
11
12
13
14
impl Aplic
pub fn set_ip(&mut self, irq: u32, pending: bool) {
assert!(irq > 0 && irq < 1024);
let irqidx = irq as usize / 32;
let irqbit = irq as usize % 32;
if pending {
// self.setipnum = irq;
self.setip[irqidx] = 1 << irqbit;
} else {
// self.clripnum = irq;
self.clrip[irqidx] = 1 << irqbit;
}
}
}

中断使能寄存器 setie/clrie 的作用类似于中断挂起寄存器,但它们允许中断被信号化。如果一个中断未被使能,则该中断会被屏蔽,无法被触发。

1
2
3
4
5
6
7
8
9
10
11
12
13
14
impl Aplic {
pub fn set_ie(&mut self, irq: u32, enabled: bool) {
assert!(irq > 0 && irq < 1024);
let irqidx = irq as usize / 32;
let irqbit = irq as usize % 32;
if enabled {
// self.setienum = irq;
self.setie[irqidx] = 1 << irqbit;
} else {
// self.clrienum = irq;
self.clrie[irqidx] = 1 << irqbit;
}
}
}

2.4 Generate MSI Register (genmsi)

img

genmsi 寄存器中有两个读/写字段和一个只读字段。即使直接写入IMSIC更高效,但可以使用 genmsi 寄存器来触发MSI写入。

HART Index是您想要发送MSI的目标HART,EIID(外部中断标识符)是要写入IMSIC的值。通常,EIID与您想要触发的中断号相同。

2.5 Target Control Registers (target[u32; 1032])

目标控制寄存器根据 APLIC 的配置方式有两种不同形式。如果 APLIC 配置为**直接传递模式,**则寄存器包含一个 HART Index和一个优先级。较小的优先级表示较高,因此 10 的优先级高于 20。

img
1
2
3
4
5
6
impl Aplic {
pub fn set_target_direct(&mut self, irq: u32, hart: u32, prio: u32) {
assert!(irq > 0 && irq < 1024);
self.target[irq as usize - 1] = (hart << 18) | (prio & 0xFF);
}
}

**在MSI交付模式下,**寄存器包含一个HART索引、客户索引和外部中断标识符(EIID)。

img

1
2
3
4
5
6
impl Aplic {
pub fn set_target_msi(&mut self, irq: u32, hart: u32, guest: u32, eiid: u32) {
assert!(irq > 0 && irq < 1024);
self.target[irq as usize - 1] = (hart << 18) | (guest << 12) | eiid;
}
}

2.6 Interrupt Delivery Control

正如我之前提到的,APLIC可以配置为MSI模式或直接模式:

  • 在MSI模式下,消息由输入MSI控制器(IMSIC)处理;
  • 然而,在直接模式下,APLIC本身将控制中断。这是通过APLIC的中断传递控制(IDC)部分来实现的。

对于QEMU上的 virt 虚拟机,中断传递控制寄存器 IDC 被内存映射到0x地址。寄存器的布局如下。

Offset Size (bytes) Register Name
0 4 idelivery
4 4 iforce
8 4 ithreshold
24 4 topi
28 4 claimi

每个IDC用于一个独立的HART,长度为32字节。因此,HART #0的寄存器从偏移量0开始,HART #1的寄存器从偏移量32开始,以此类推。


idelivery 寄存器启用了APLIC的直接传递模式。如果该寄存器设置为1,则APLIC可以传递中断,否则,如果该寄存器设置为0,则APLIC不传递中断。

img

The idelivery register


中断强制寄存器强制 APLIC 提交中断 #0。如果我们向该寄存器写入1,并且 APLIC 的中断已启用,则这将发出一个中断信号。

img

The iforce register


中断阈值寄存器设置了能够被监听到的中断优先级的阈值。阈值为0意味着所有中断都可以被监听到。如果值非零,则该值或更高优先级的任何中断都会被屏蔽,因此无法被监听到。在这种情况下,与其他所有情况一样,数字越小,优先级越高。不要被0所迷惑,它只是一个特殊值,可以解除所有优先级的屏蔽。然而,阈值为1意味着所有中断都会被屏蔽,而阈值为2意味着只有优先级1的中断可以被监听到。

img

The ithreshold register


topi 寄存器保存的是最高优先级且已启用的中断号。该寄存器分为两部分:

  • 25:16 位保存中断号
  • 7:0 位保存中断优先级

img

The topi and claim registers

申请寄存器与顶级中断寄存器相同,只是它表示我们正在申请顶级中断。当我们从该寄存器读取时,给定寄存器的挂起位将被清零。

我制作的仓库上的操作系统只使用MSI传递模式,因为这种传递控制方式与旧的PLIC非常相似。

3 结论

QEMU的 virt 虚拟机将UART连接到外部IRQ#10,因此我们可以在UART接收器有数据时使用APLIC发送消息。这要求我们使用上述寄存器来设置APLIC。

在下面的代码中,我在M/S模式之间进行了分割,并将UART委派给S模式APLIC(索引0)。

1
2
3
4
5
6
7
8
9
10
11
12
13
14
15
16
17
18
19
20
21
22
23
24
25
26
27
28
29
30
31
32
pub fn aplic_init() {
// The root APLIC
let mplic = Aplic::as_mut(AplicMode::Machine);
// The delgated child APLIC
let splic = Aplic::as_mut(AplicMode::Supervisor);

// Enable both the machine and supervisor PLICS
mplic.set_domaincfg(false, true, true);
splic.set_domaincfg(false, true, true);

// Write messages to IMSIC_S
mplic.set_msiaddr(AplicMode::Supervisor, crate::imsic::IMSIC_S);

// Delegate interrupt 10 to child 0, which is APLIC_S
// Interrupt 10 is the UART. So, whenever the UART receives something
// into its receiver buffer register, it triggers an IRQ #10 to the APLIC.
mplic.sourcecfg_delegate(10, 0);

// The EIID is the value that is written to the MSI address
// When we read TOPEI in IMSIC, it will give us the EIID if it
// has been enabled.
splic.set_target_msi(10, 0, 0, 10);

// Level high means to trigger the message delivery when the IRQ is
// asserted (high).
splic.set_sourcecfg(10, SourceModes::LevelHigh);

// The order is important. QEMU will not allow enabling of the IRQ
// unless the source configuration is set properly.
// mplic.set_irq(10, true);
splic.set_ie(10, true);
}

当UART发送中断时,我们现在可以在IMSIC中编写UART处理程序。

1
2
3
4
5
6
7
8
9
10
pub fn imsic_handle(pm: PrivMode) {
let msgnum = imsic_pop(pm);
match msgnum {
0 => println!("Spurious 'no' message."),
2 => println!("First test triggered by MMIO write successful!"),
4 => println!("Second test triggered by EIP successful!"),
10 => console_irq(),
_ => println!("Unknown msi #{}", msgnum),
}
}

上面的代码将任何消息#10转发到 console_irq,而 console_irq 则从UART设备的接收缓冲寄存器中弹出一个值。

一切都说完了,我们可以开始接收UART消息了。

image-20231211124316885


最后整理于 2025-11-11

